

Greetings from the Jersey Shore! Last time we met in Riff was the debut issue where I served up a lesson on some cool encounters with the 7#9 chord. All three examples were inspired by fun times with amazing players I had recently shared a stage with including Bob Lanzetti (Snarky Puppy), Rob Compa (Dopapod) and our own resident blues twister Oz Noy. The truth is delving in the minds of other players is a great source for your own ideas. Such is the case with this lesson on bending, which was inspired by a recent episode that involves one all the all-time greatest players and one who is a personal hero and big-time influence on me: Steve Vai.
I’ve wanted to do a Guitar Gym Course Series installment on bending for a quite some time, but until recently I had yet to come up with a starting point for Workouts that felt right. During the pre-production process for Steve’s debut TrueFire course Alien Guitar Secrets: Passion & Warefare I was asked to deeply probe the course’s namesake album for the studio team so they had a reference of key points to use during the session. Not able to resist plugging in my ’87 Jem 777DSY and re-visit all the completely awesome licks that pepper this record from start to finish, I quickly found myself swimming in a pool of ideas for bending Workouts!
Below is a trio of examples that are work-in-progress candidates for what will become Guitar Gym: Bending. These are what I would likely use in Level 3 so they’ll be listed at the usual starting tempo of 60bpm.
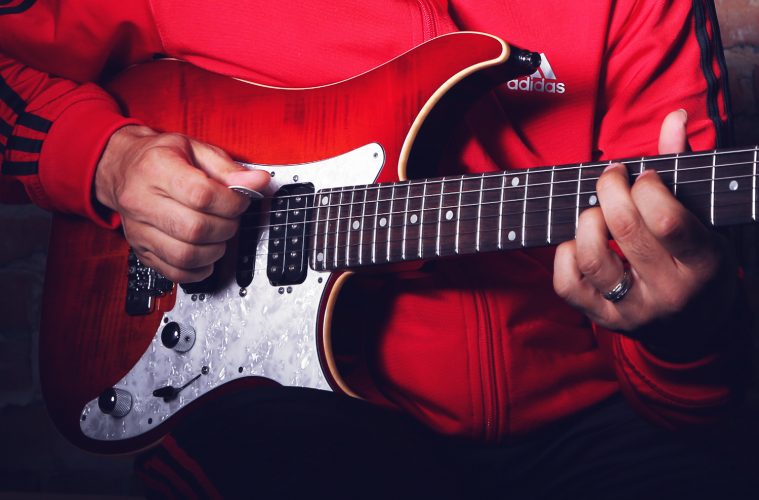
EXAMPLE 1
Example 1 is based on unison bends – a bending approach I always like to start with when introducing the technique as it helps to get across the importance of bending in tune. The vibe and the phrasing is reminiscent of the opening idea from “Greasy Kid Stuff” right after Steve talks down some production notes.
Whether you’re playing bars 1-2 on the B and E strings or bars 3-4 on the G and B strings you should approach fingering the unison bends the same way by fretting the starting point note (the note you’re bending) with your fret hand 3rd finger supported by the 2nd finger right behind it on the next lower fret. The 1st finger need needs to hold down a unison note on the higher adjacent string relative to the note you’re bending to. The goal is to have both notes ultimately sound in tune producing a thick, doubling effect. This is a great way to monitor what I call “bending intonation.”
Take note: The distance between the two notes you’re fretting simultaneously on each string set are offset by one fret due to standard tuning. The higher string set fingering spans three frets as opposed to the two fret span of the G and B string set.
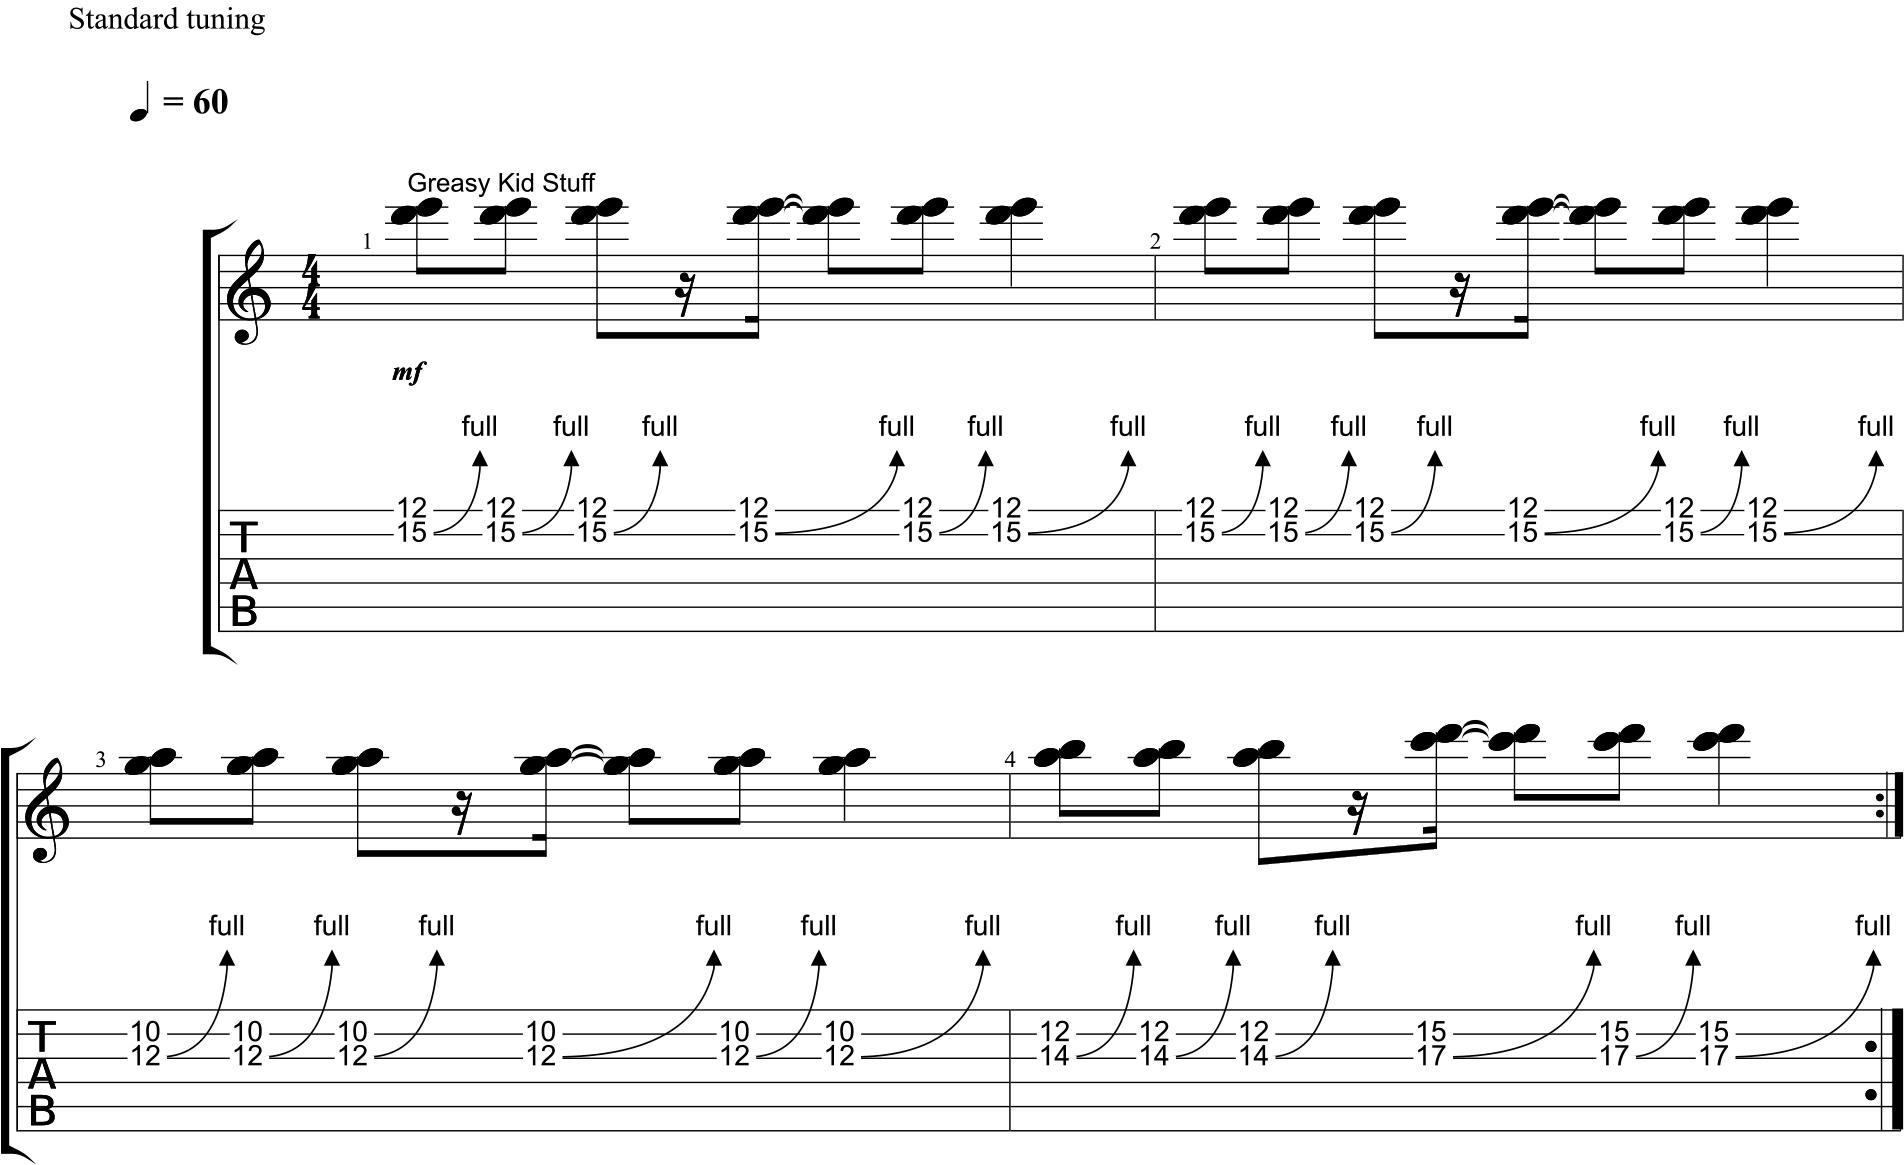
EXAMPLE 2
Example 2 works off some ideas from the opening main melody heard in “Blue Powder” and sets them in a four-bar I-IV-V scenario. Check it out:
Bar 1 sets up the general approach to the bends with the first bend at beat 2 going up a whole step by way of your 3rd finger supported by your 2nd finger one fret behind much like Ex. 1. The difference is the 1st finger is free allowing you to use it as a way to cut out unwanted string noise by gently laying it over the lower adjacent strings. An added bonus as a result of that approach is the ability dig in or “rake” the lower adjacent string(s) on your way to picking the string you’re about to bend. I always go for a little extra attack on a string I’m going to bend given the fact I’m about to stretch it, thus dulling the vibration potential of the string as a result.
Continuing to look at bar 1 the 4th fret half step bend-and-release on the upbeat of beat 3 should be played with your 1st finger. A tried-and-true method for 1st finger bending is pulling the string towards the floor – try it! Be aware the same bend at the upbeat of beat 3 in bar 3 at the 11th fret is held over through beat 4 and, when you’re ready, would do well with a little vibrato applied.
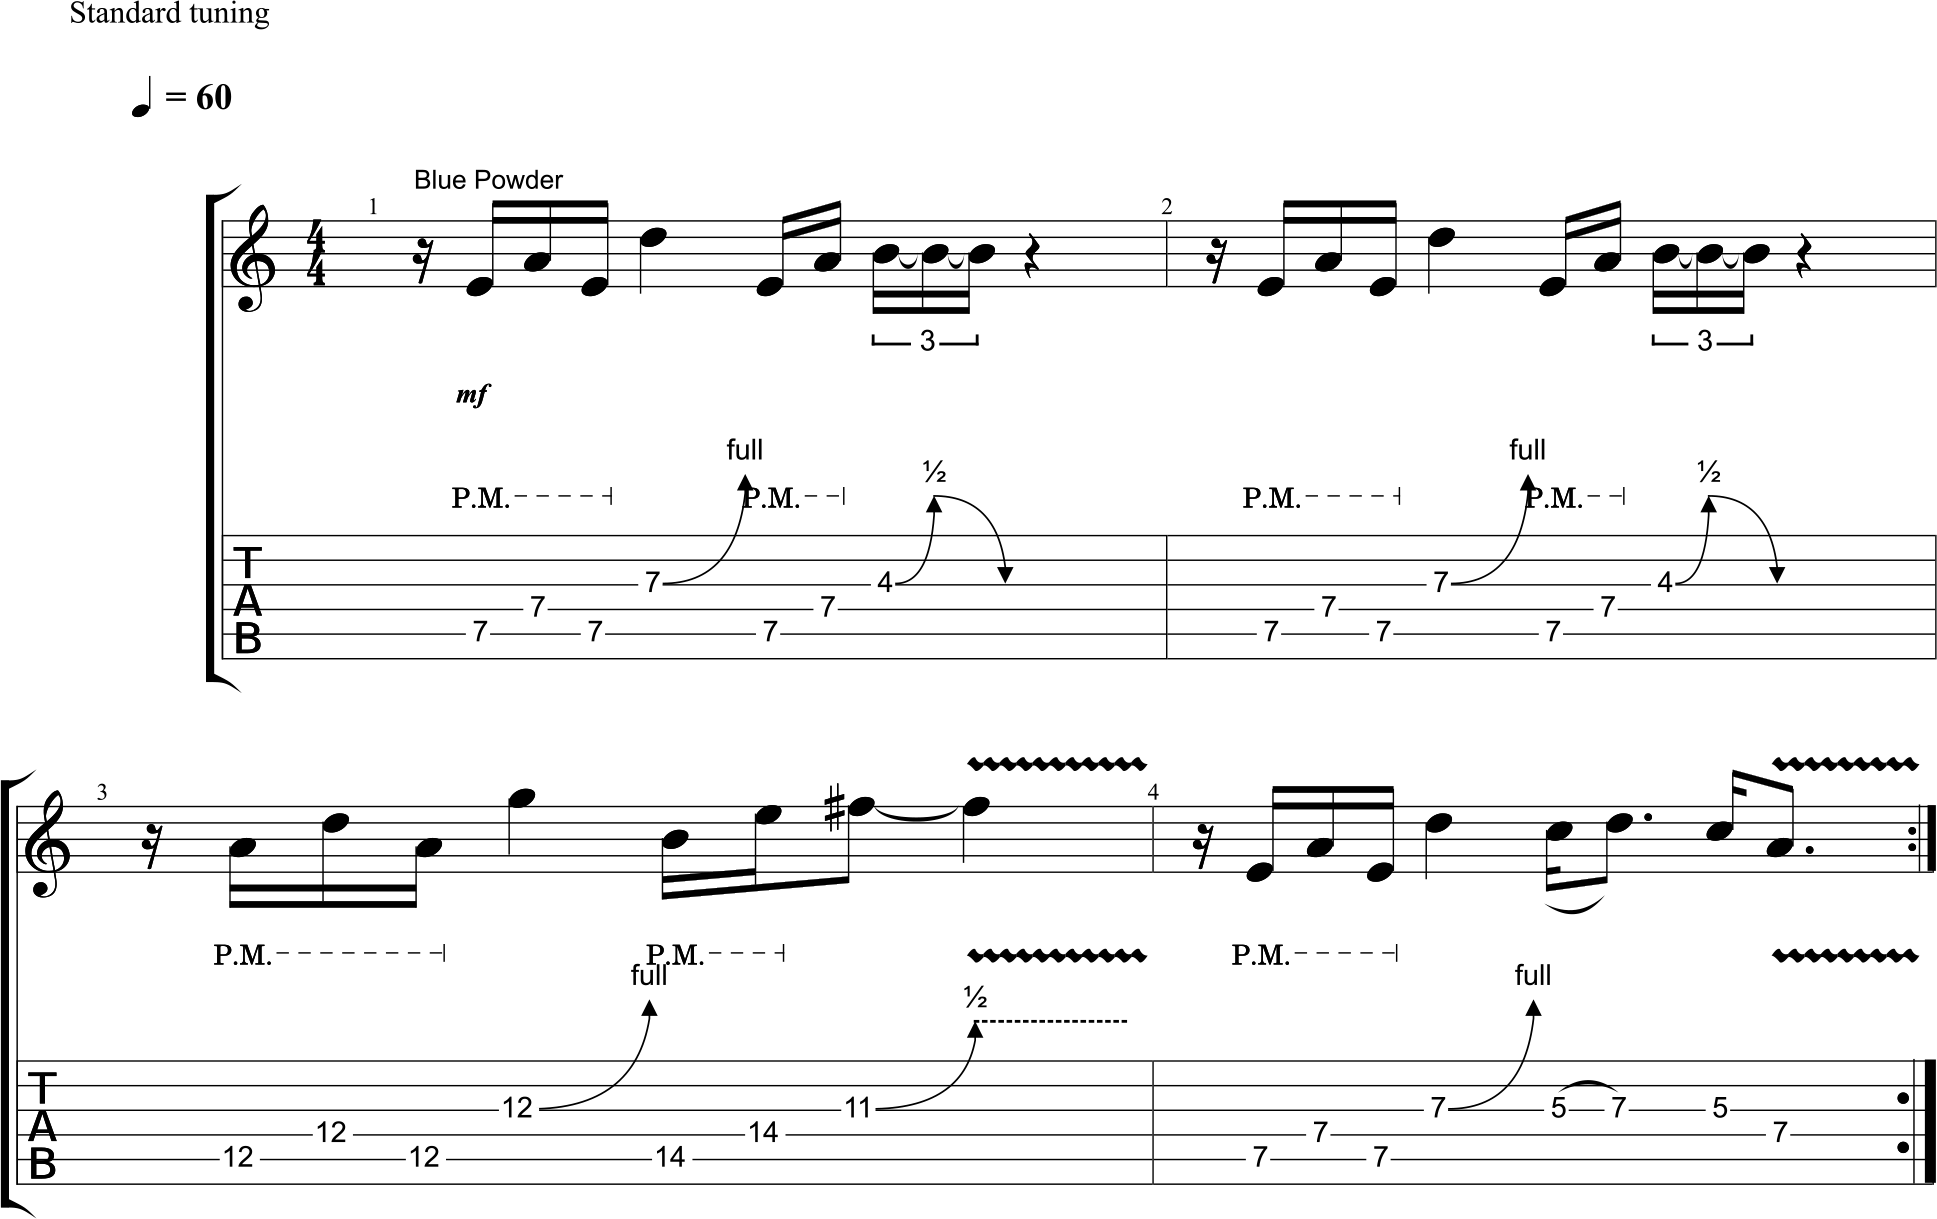
EXAMPLE 3
The final example pays homage to some choice moments in a solo break heard in “The Animal.” The Workout stays exclusively on the B string for all four bars, but throws a curveball with regards to phrasing and bending distance in bar 4.
Bars 1-3 take the same syncopated approach with whole step bends from the 10th fret (A), 15th fret (D) and 18th fret (F). The trick is playing those pure starting point notes (no bend) on the preceding 16th notes without prematurely starting to push the bend up. The order of events flips in bar 4 with the bend being played first starting on the downbeat followed by the pure starting point note on the next 16th note subdivision. That’s the easy part when you compare it to the intended bending distance: Two whole steps!
As you play through these would-be Workouts keep in mind these general tips on bending…
- Your top priority is playing any and all bends in tune. This is why I start players on unison bends as there’s no hiding when it comes to bending intonation!
- Look to support the 3rd finger that’s fretting the starting point note with the 2nd finger on the next lower fret.
- Whenever possible use your fret hand 1st finger to make contact with the lower adjacent strings to help cut out unwanted string noise.
- When using your 1st finger to bend pull the string down towards the floor.
- When using your 2nd or 3rd fingers to bend keep them as arched as possible throughout the bend. This will prevent the string from slipping under your fingertip thus making the bend sound flat even when it feels right.
- When starting to apply vibrato to your bends always be mindful somewhere in the back-and-forth of the applied pitch modulation the in-tune state of the note should be in the mix. Simply put, don’t wiggle the note in various degrees of out of tune!
- If you find bends a whole step or more cutting out for no apparent reason check the radius of your neck. When it comes to bending the flatter, the better. I’ve found my bare minimum is a 12” radius.
- Another guitar design factor is scale length. Expect bending pressure and distances to feel different on different scale lengths. The same could be said for string gauges and the combination thereof.
- If you’re having trouble getting a good bending technique off the ground consider the setup of your guitar. Your action could be working against you both in being too high as well as too low. Also consider the frets – the taller and wider the frets the easier bending can be. Even more so when playing with thicker gauge strings.
- Regardless of the aforementioned physical attributes expect bending anything more than a half step on the hi-E string below the 7th fret to be the most difficult.
- If you find yourself often going out of tune after playing a bend try changing your strings. If you just changed them be sure to properly stretch them. If you’re still having trouble and you’re confident your installing the strings in the tuners in a way that should result in a tight wind, consider locking tuners and/or making sure your nut is not catching the string. In regards to the latter a surefire indicator is a pinging sound when tuning. This is where a well-maintained graphite nut comes in handy!
- Lastly, always remember a Gibson G string loves to go out of tune after a hefty bend. Sad, but true.
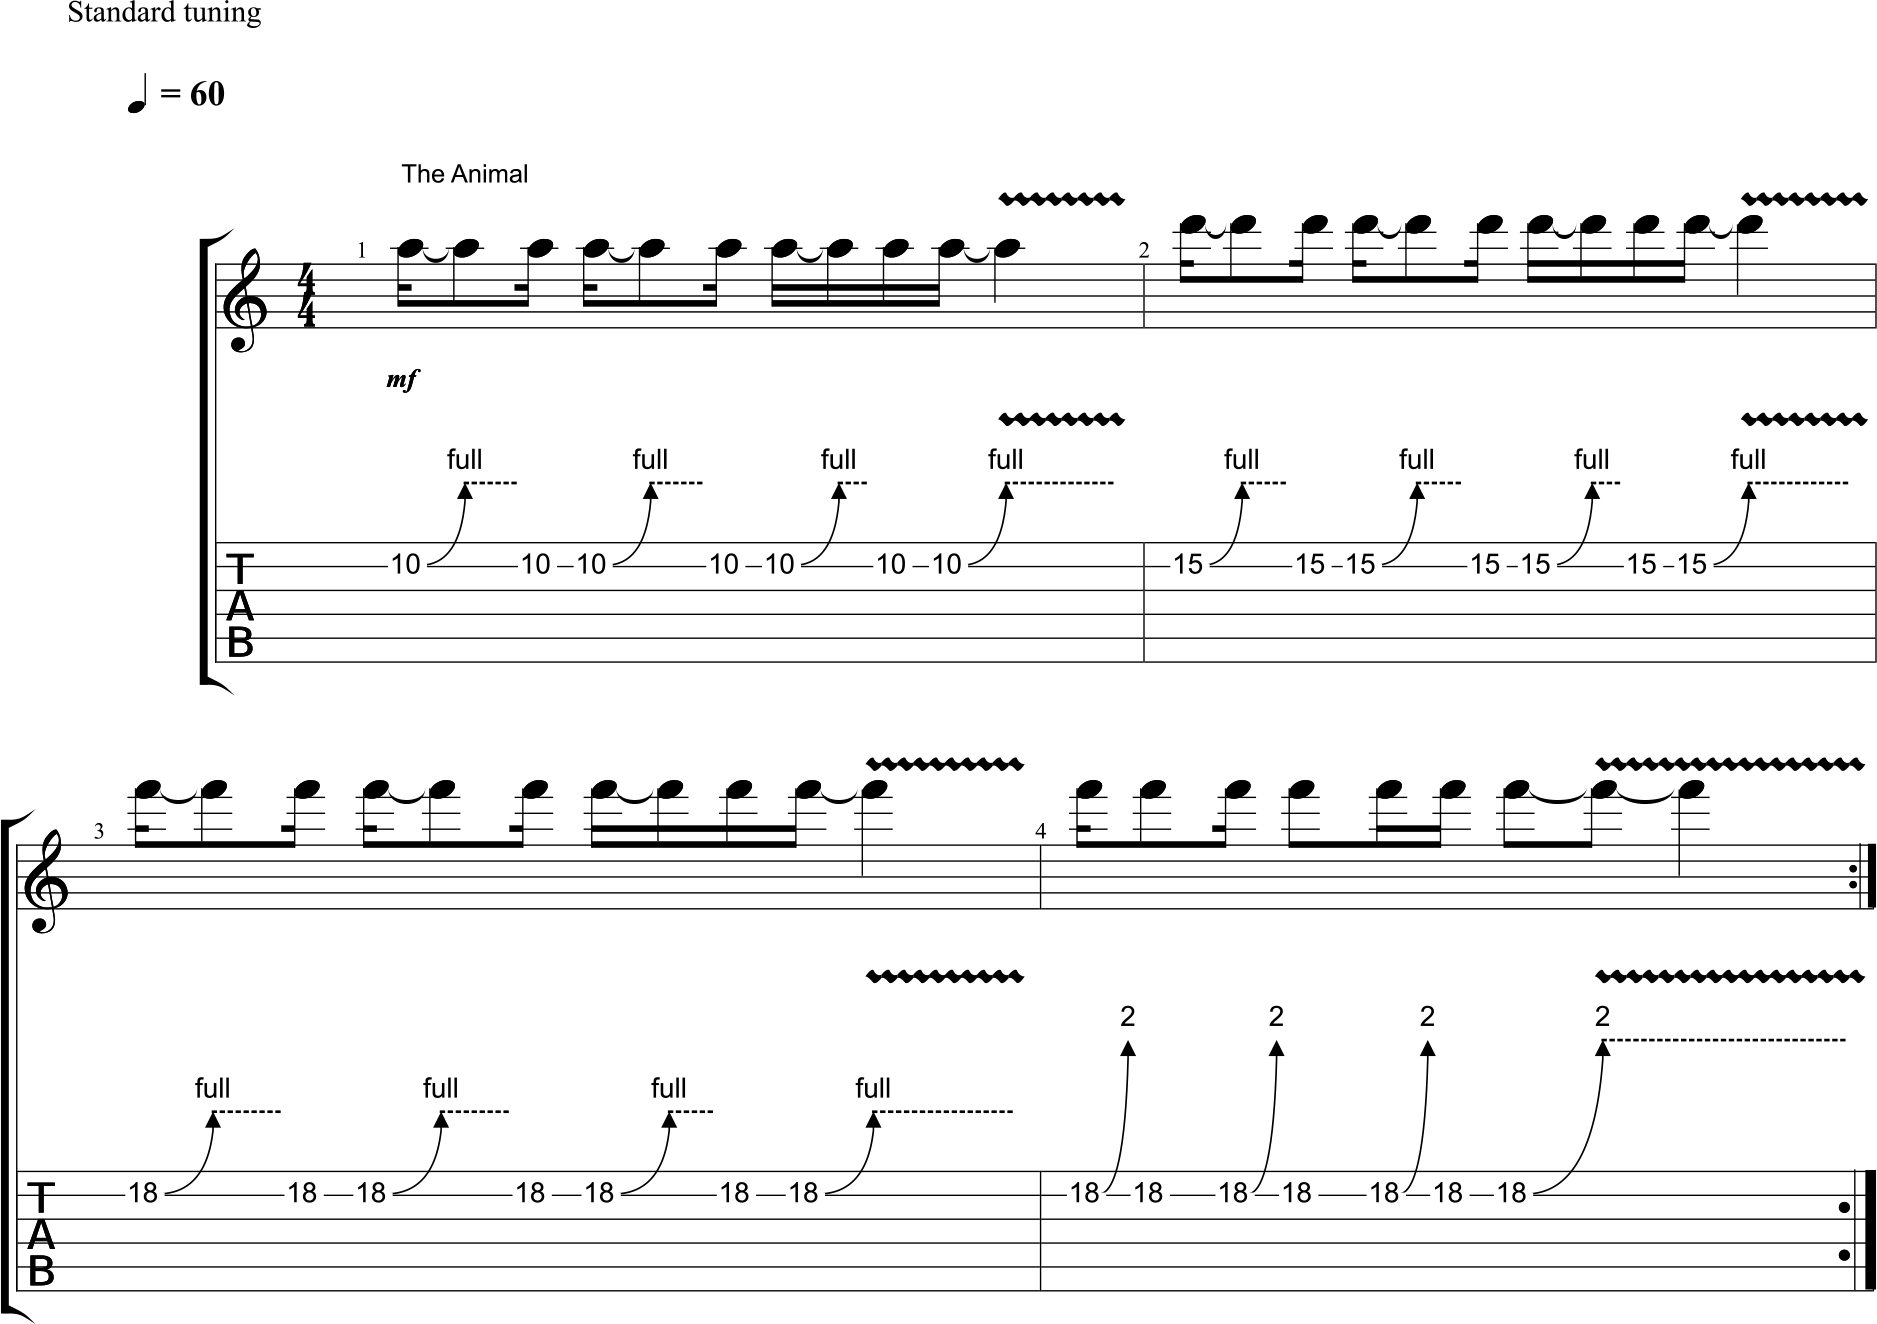
Have fun and see you in an Adidas tracksuit soon. The next color is blue with black stripes!