
One of the beautiful things about playing fingerstyle guitar is that the raw techniques themselves open up a world of possibilities that aren’t physically or musically possible with a pick alone or without the use of multiple fingers on the picking hand. Having multiple digits simultaneously working together and or independently allows you to play multiple parts at once, including bass, chords, rhythms / polyrhythms, counterpoint, contrary lines, and chord melody. Just give a listen to Chet Atkins play “Yankee Doodle Dixie”, in which he plays two songs at the same time, or Jerry Reed performing “Two Timin’”, “Blues Land”, or “Swingin ’69”, where you can hear moving lines in the bass, chords, contrary motion, and melody, all executed simultaneously with mesmerizing musicality. Another mind-bending example demonstrating the possibilities of what can be achieved high up in the fingerstyle stratosphere is legend Lenny Breau with his innovations of techniques for playing fingerstyle Jazz, especially the piano-like feat of comping for himself while improvising at the same time.
With the proper techniques, some clever thinking, and ingenious arranging, a good fingerstyle player can essentially boil down various parts of a band to become a solo performer, without any lack of groove, harmony, or melody. This is what Brazilian innovator João Gilberto did by taking the sounds of Samba that were traditionally played by a large ensemble and distilling them into a method of suggesting all those parts on one guitar. While there are endless possibilities spanning across various styles, it is the implementation of raw techniques that makes these complex musical ideas playable, and importantly as efficient as possible. While the above mentioned guitar giants are utilizing some very advanced concepts, this lesson will explore a few possibilities of how to build a foundational groove with bass and chords utilizing intermediate – advanced fingerstyle patterns which make it all possible on one guitar.
 Essentially we want to break out of being a rhythm section player to becoming the entire rhythm section on one guitar. We need to roughly imitate some basic idiosyncrasies of the drummer (rhythm), piano or guitar player (harmony), and bass players’ parts. Buster B. Jones explained to me that his own funky style, which was full of groove and syncopation, came from this way of thinking, with much influence from his years of playing drums. He viewed the right hand (picking hand) as the drum set and the left hand (fretting hand) as the piano. To hear this type of thinking in a musical situation listen to Jones perform his compositions “Live at Five”, “Buster B. Boogie”, or “Funky Fingers”, and for a great example of becoming the entire rhythm section as I mentioned above, listen to the Jerry Reed’s groove-driven guitar parts on his original recordings of “Guitar Man”, “Last Train To Clarksville”, “Tupelo Mississippi Flash”, and “Wabash Cannonball”, where even though there is a rhythm section in the commercial recordings, Reed is carrying the groove, harmony, and all essential musical material in his guitar part alone.
Let’s take a look at a few of the possible pathways to achieve our one-person-band sound. The first pathway is to start with a picking pattern. In this first example a syncopated Reed-style pattern will repeat and serve as the rhythmic foundation for the groove. Note: the notation in Ex. 1 is showing the rhythm of the pattern (1 2 3+ 4+) as well as the fingers of the picking hand, not the standard TAB, see legend:
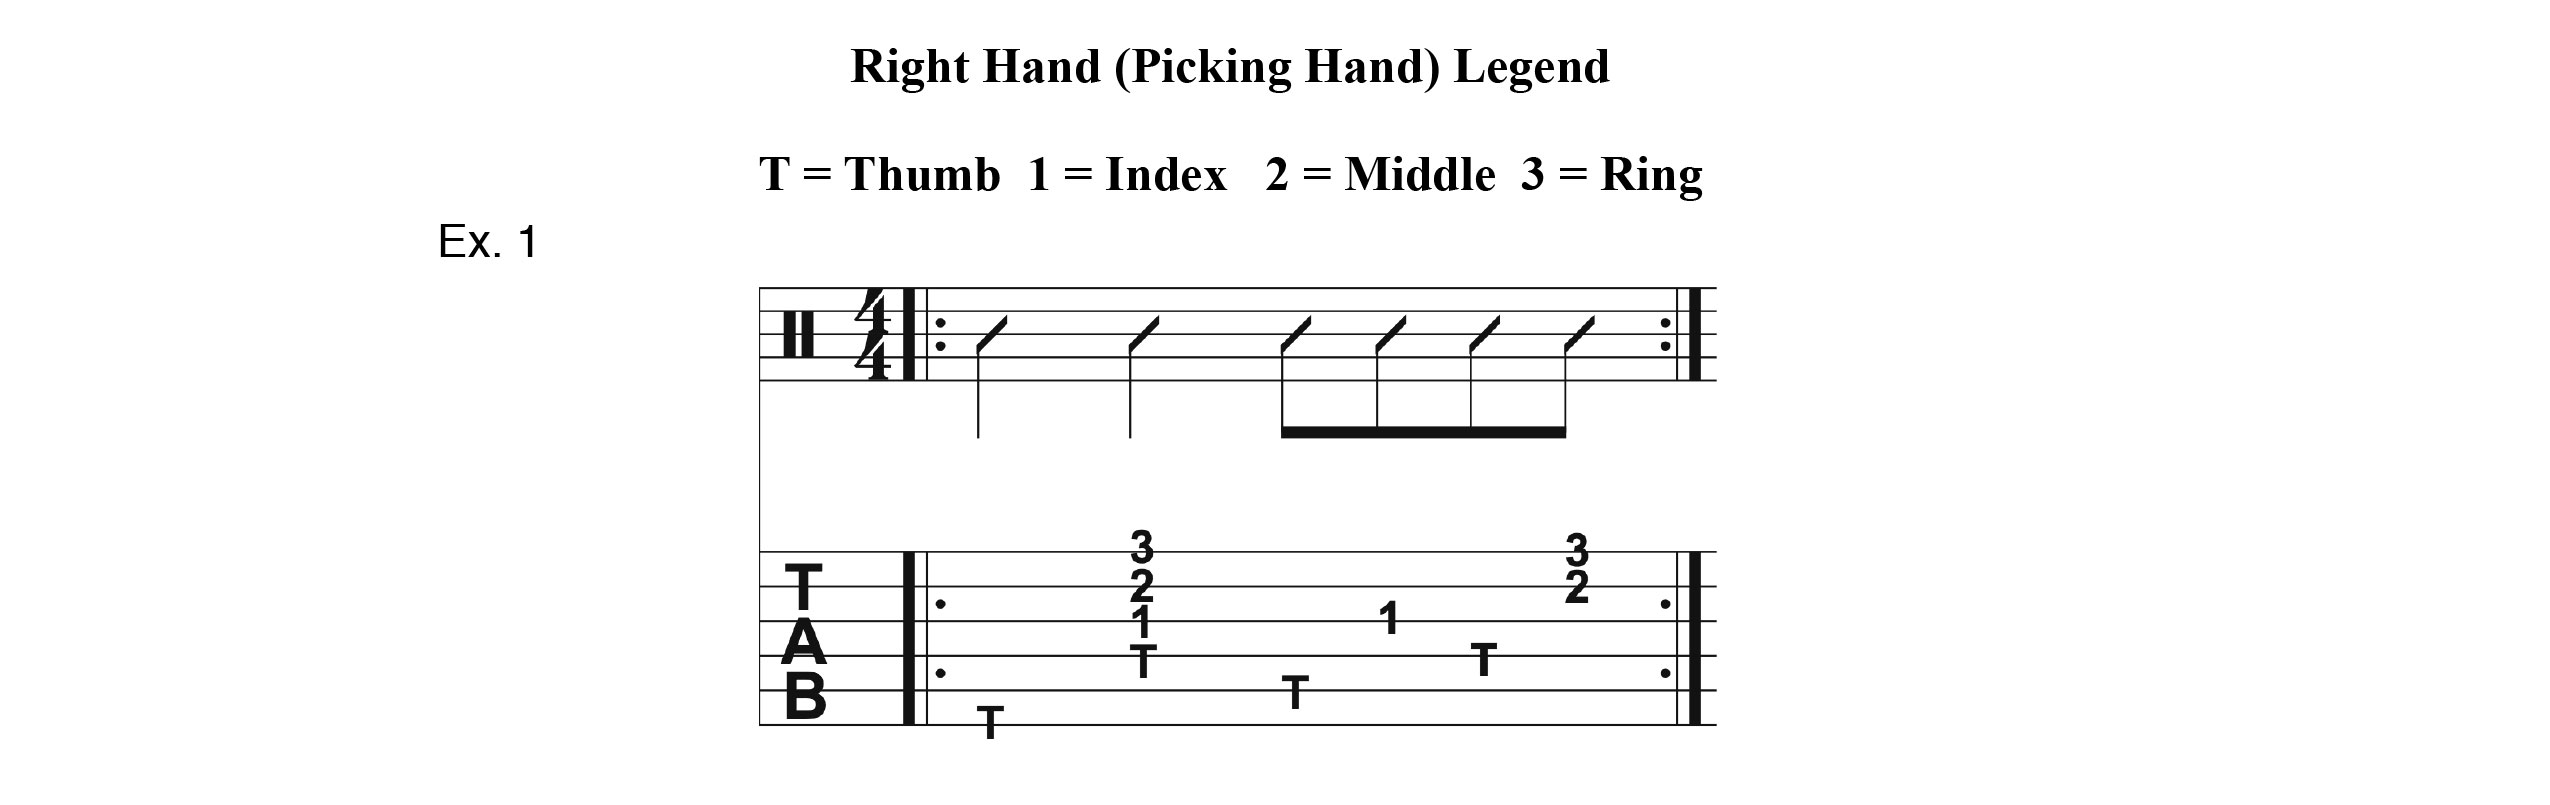
First play through the pattern in Ex. 1. Strive for accuracy, good tone, even 8th notes, and play it until you’ve memorized it, focusing on the picking pattern itself, not on the chords or fretting hand (use open strings, or mute the strings). Make sure your thumb is playing steady quarter notes and you’re using the exact fingering shown.
Once you’ve got the raw picking pattern under your fingers try applying it in Ex. 2 over a single chord E7(9). (Ex. 2 is notated in standard TAB / Notation):
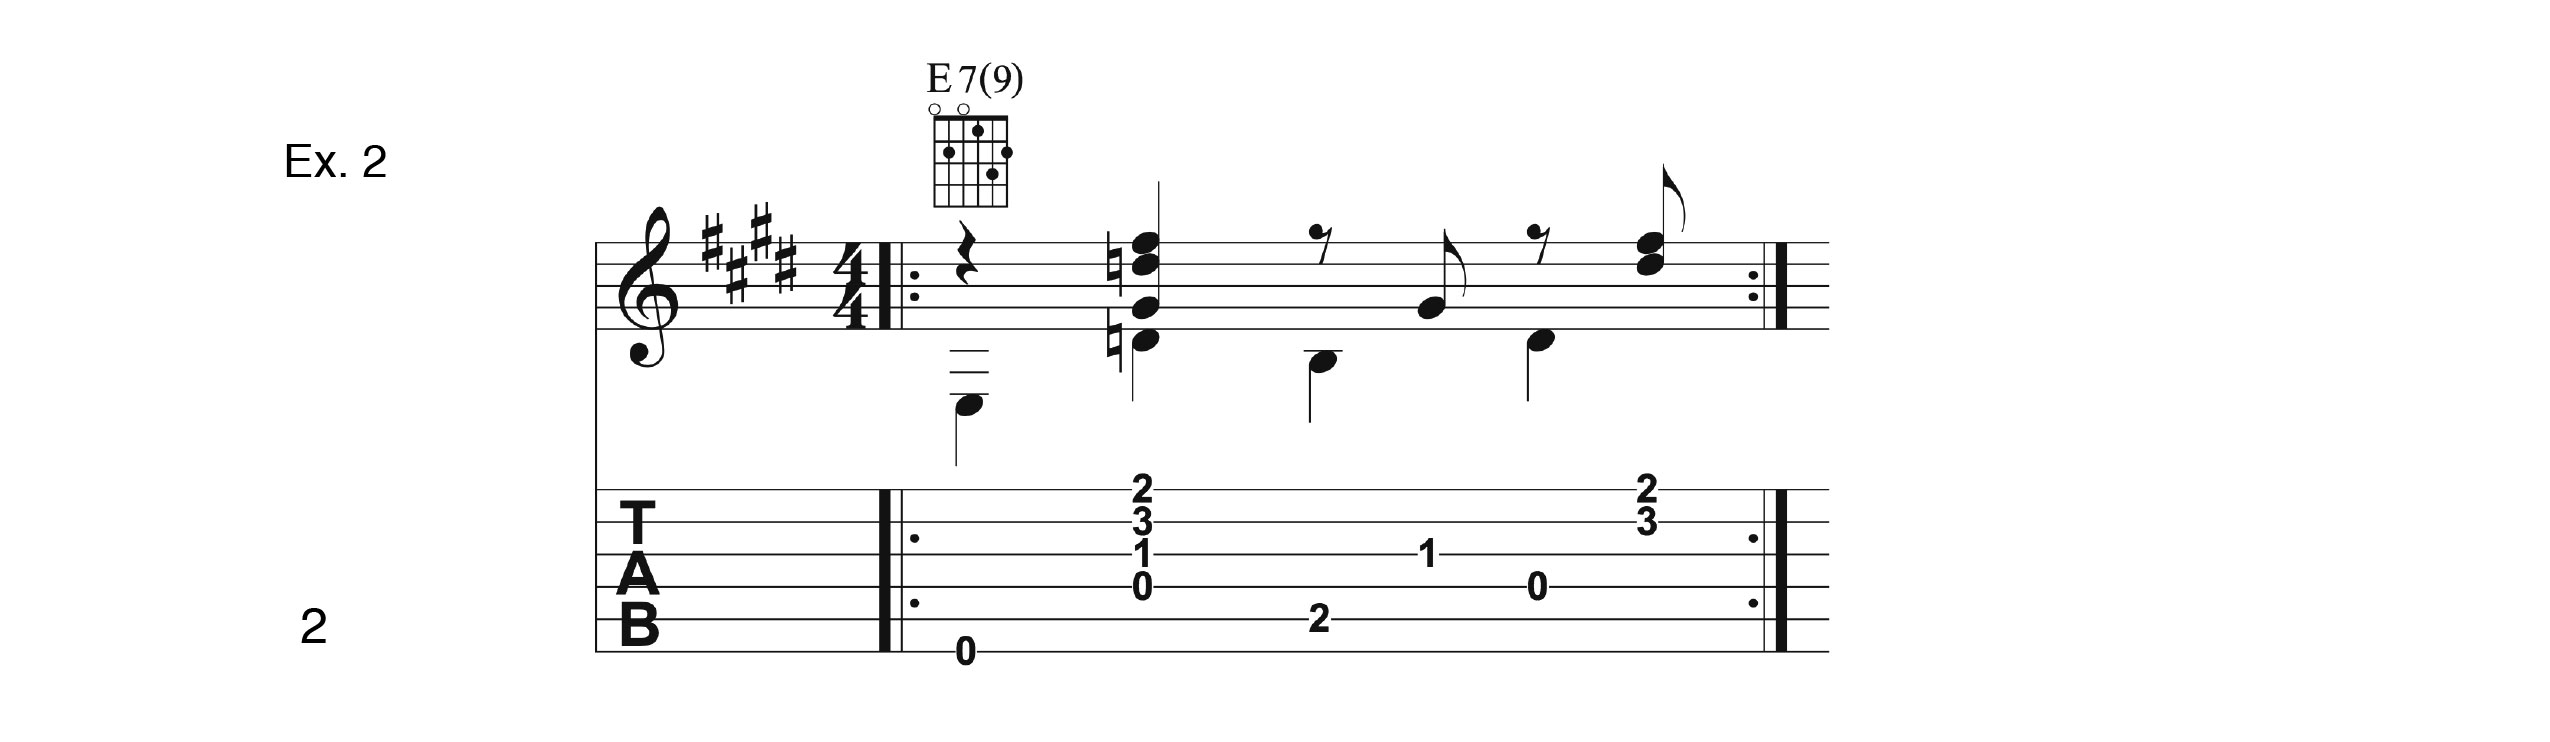
This pattern creates a nice groove with syncopation and built-in double stops. Double check that your thumb is playing steady (this means it doesn’t stop!) quarter notes on the 4th, 5th, and 6th strings. The ring, middle, and index fingers are on the 1st, 2nd, and 3rd strings respectively. Triple check that when you’re playing the pattern the middle and ring finger are paired together on the “and” of beat 4.
Now let’s take the picking pattern from Ex. 1 and apply it to an 8-bar chord progression in Ex. 3. Please be aware that the thumb plays the root of the chord on beat one of each measure (similar to what a bass player may do).
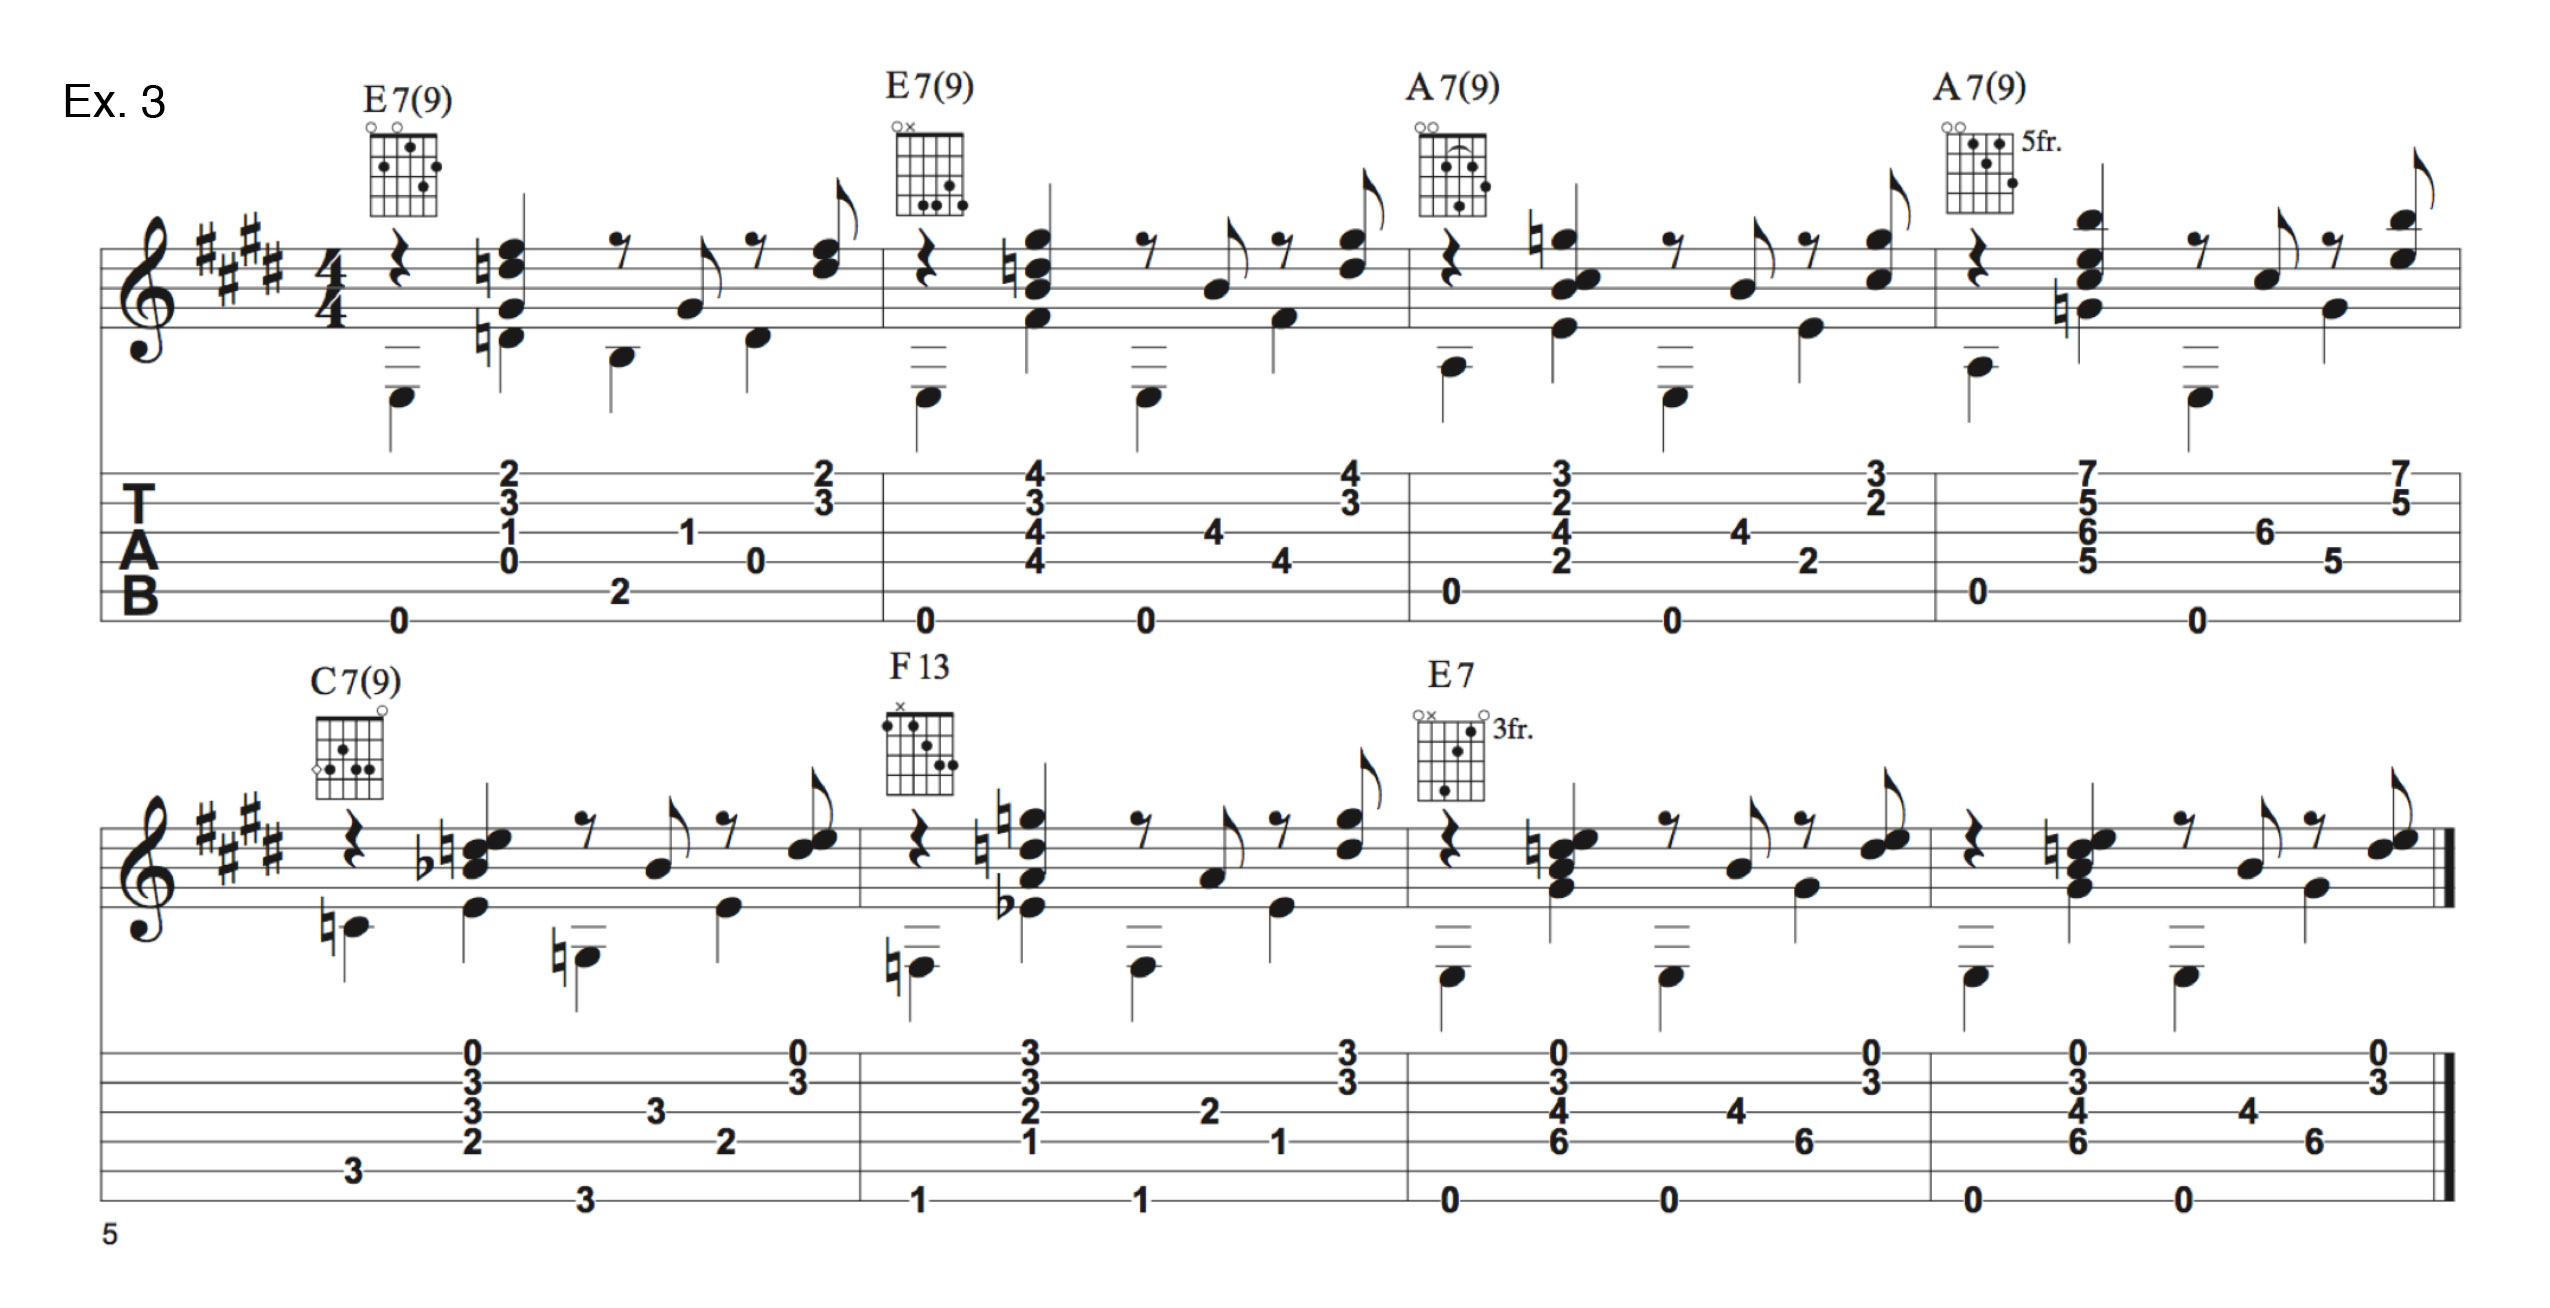
(Experiment with applying the pattern from Ex. 1 to any progression(s) of your choice).
At the core of our groove here we are subtly emulating the basic rhythm section “band” members. The underlying rhythm itself suggests a drum groove, our thumb playing on quarter notes is suggesting a simple bass part (and or a four-to-the-floor bass drum part), and finally the fingers are playing a syncopated harmony part that suggests something that might be played by a piano or guitar.
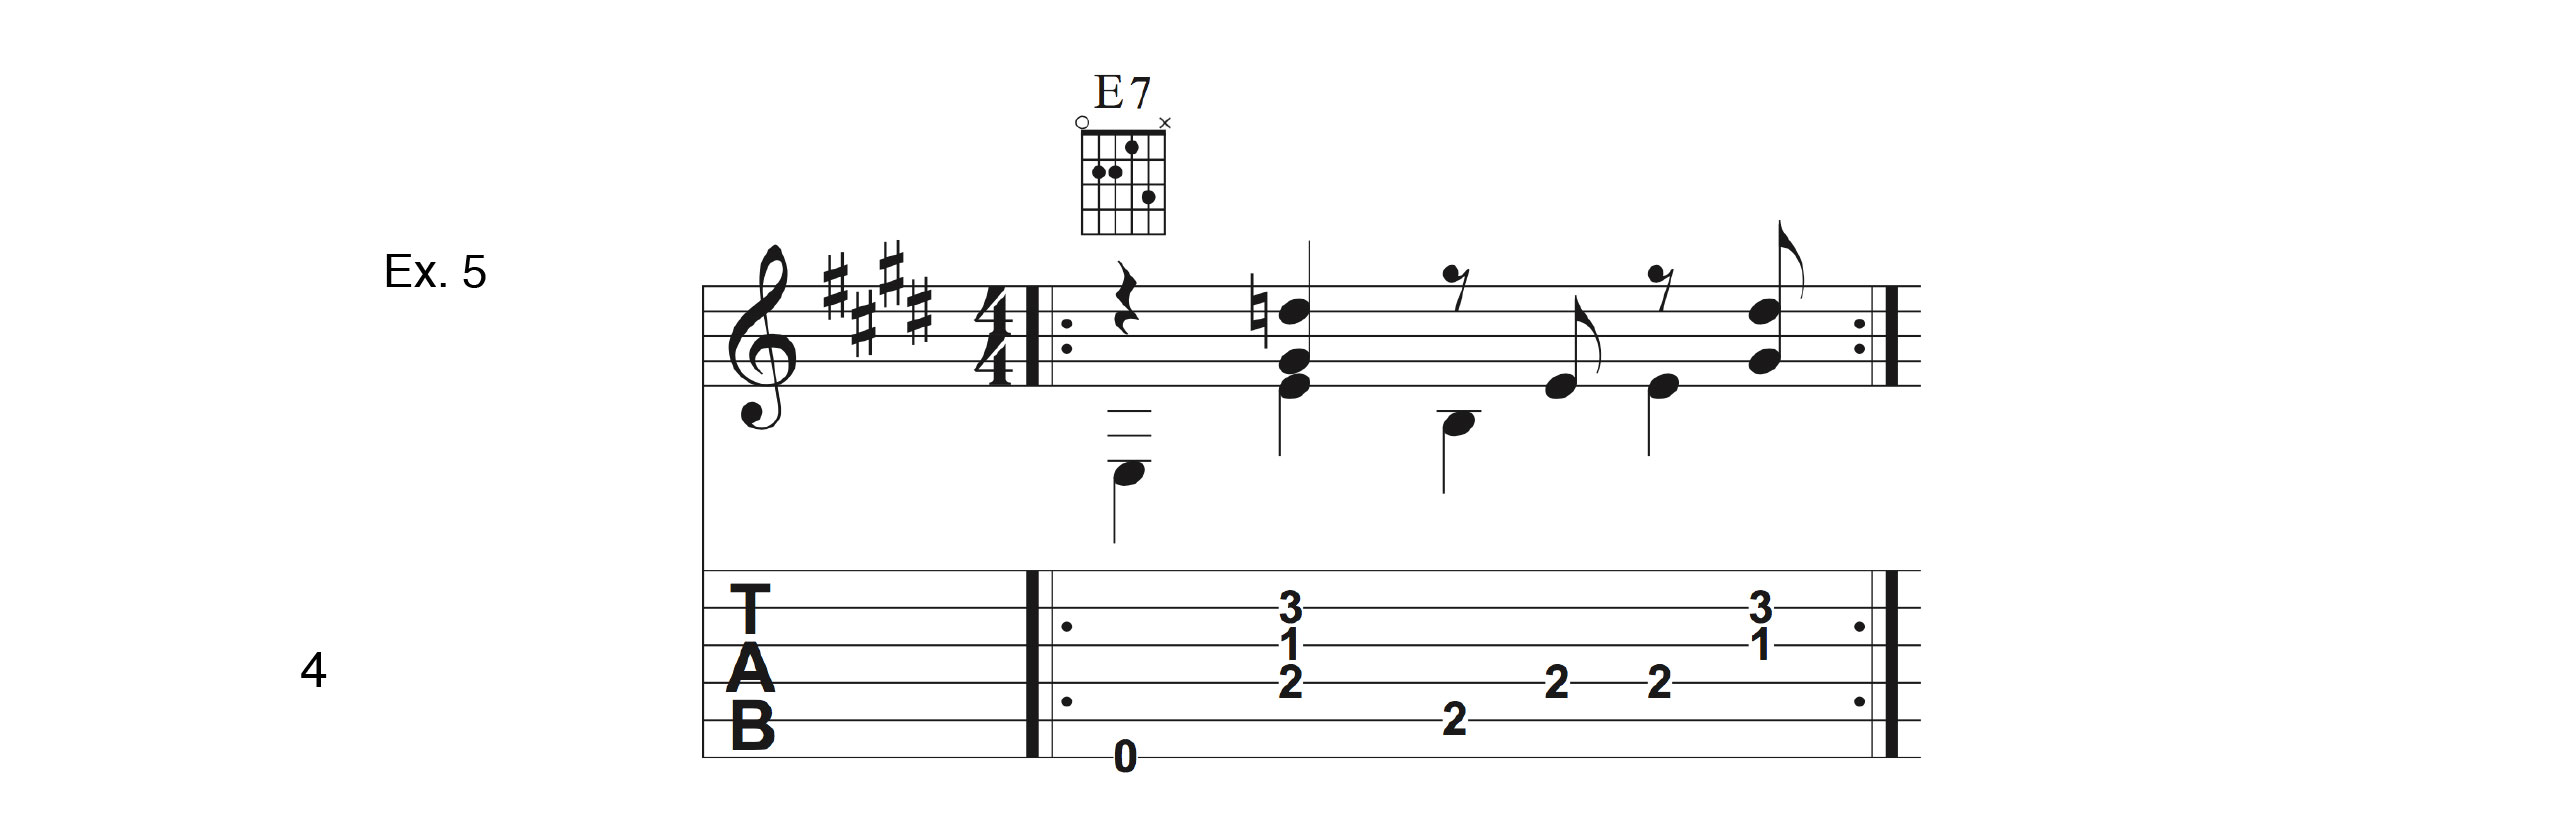
To take this concept another step further we will explore the “double picking” technique where the thumb and index finger will share a common string. This will be accomplished by moving the ring, middle, and index fingers down one string, from the 1st, 2nd, and 3rd strings respectively, to the 2nd, 3rd, and 4th string. The double picking will come out of necessity since the thumb and index finger will both be playing the 4th string, which will present an opportunity to vary or alternate the note(s) being played on that string. Ex. 4 will show our first pattern from Ex. 1 modified into a double picking pattern to prepare us for the next step, which is to create a more melodic line in the bass. Closely compare Ex. 4 to Ex. 1 to see the shift of the fingers on the picking hand.

Ex. 5 shows the double picking pattern applied to an E7 chord in first position.
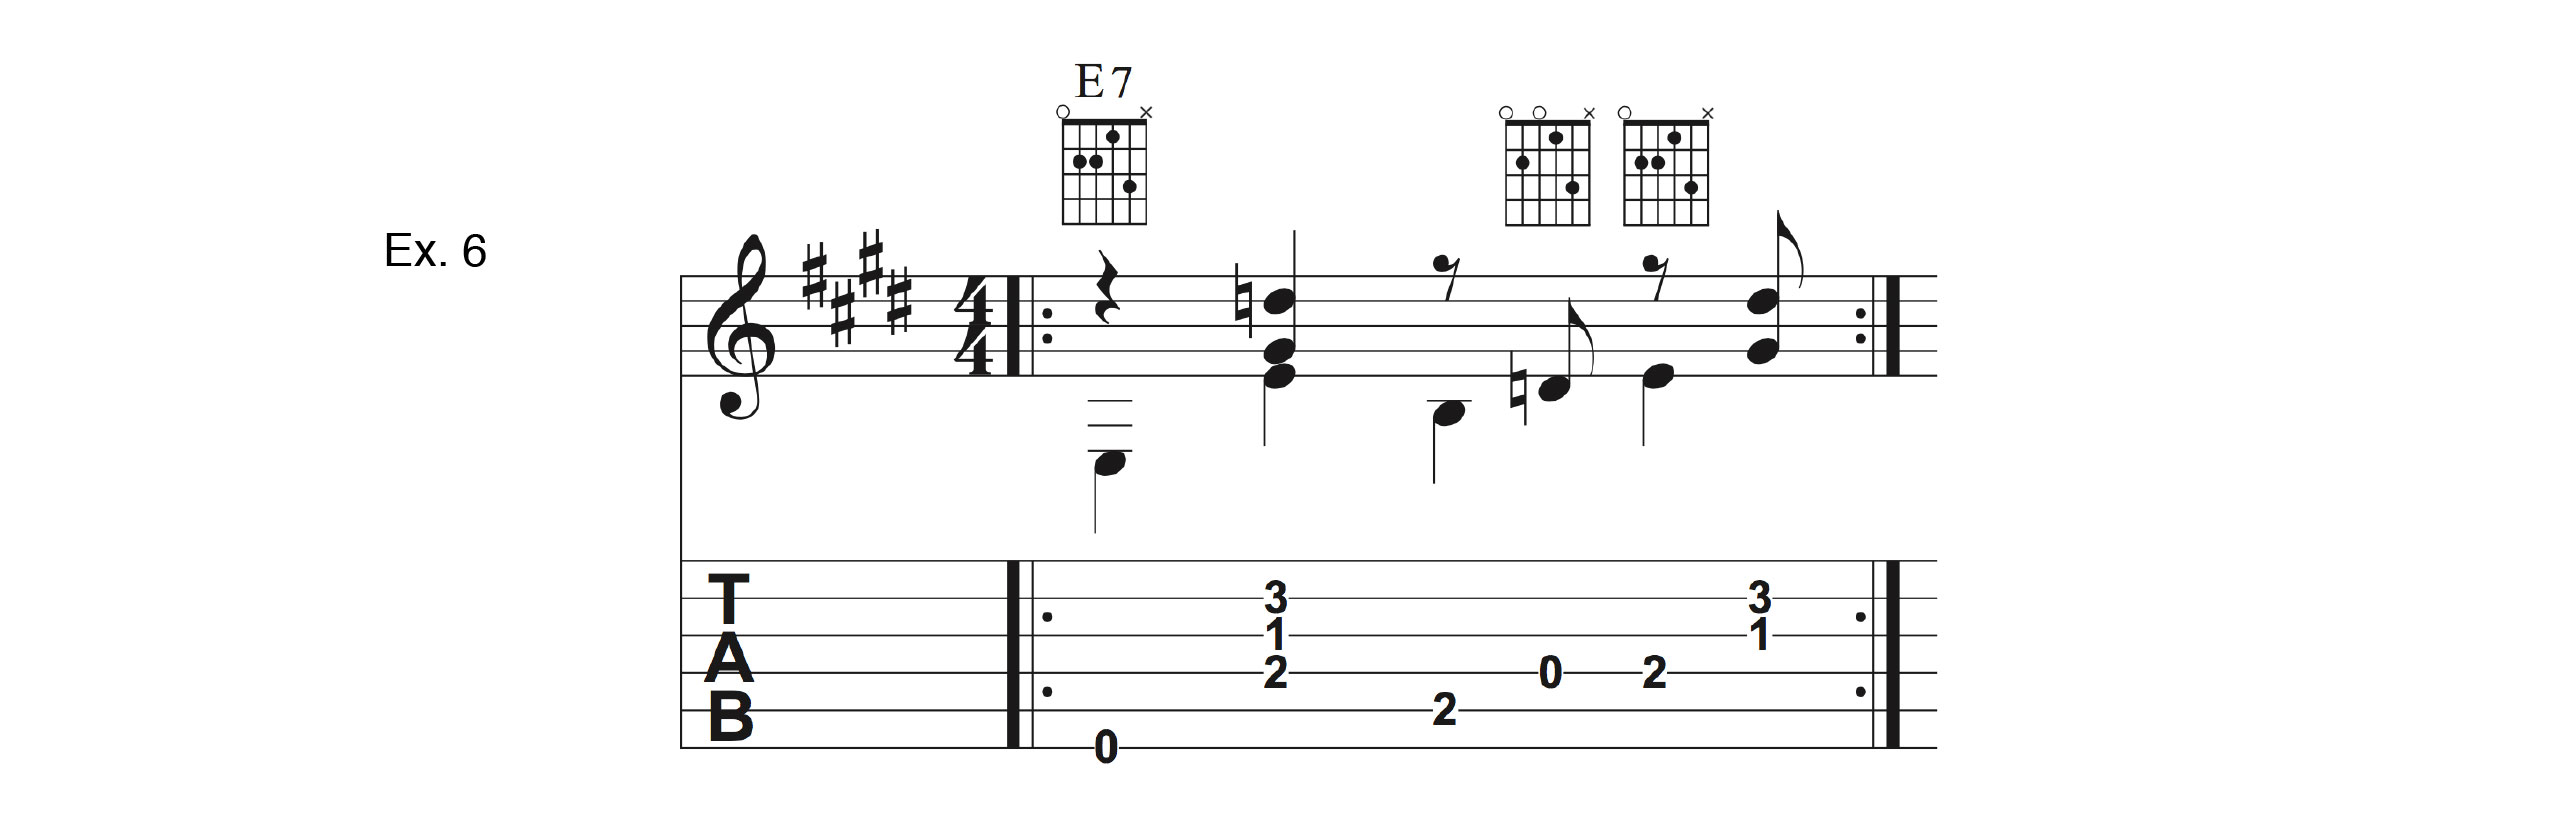
Throughout the measure we play the 4th string three times in close succession (within two and a half beats). This doubling or tripling of the same note can sound repetitive so to give more motion in the bass we can alternate that note as demonstrated below in Ex. 6. Utilizing this type of technique will effectively help create a simple repeating melodic line in the bass, an ostinato. Note that on the “and” of beat 3 you will need to play the open 4th (D) string before returning a finger to fret the 2nd fret, 4th string on beat 4.
Ex. 7 demonstrates another rhythmic pattern placing the chord tones played by the middle and ring finger on beats two and four, thus emulating a snare drum hitting on the backbeat. (Note only the picking hand fingering is shown, not TAB)

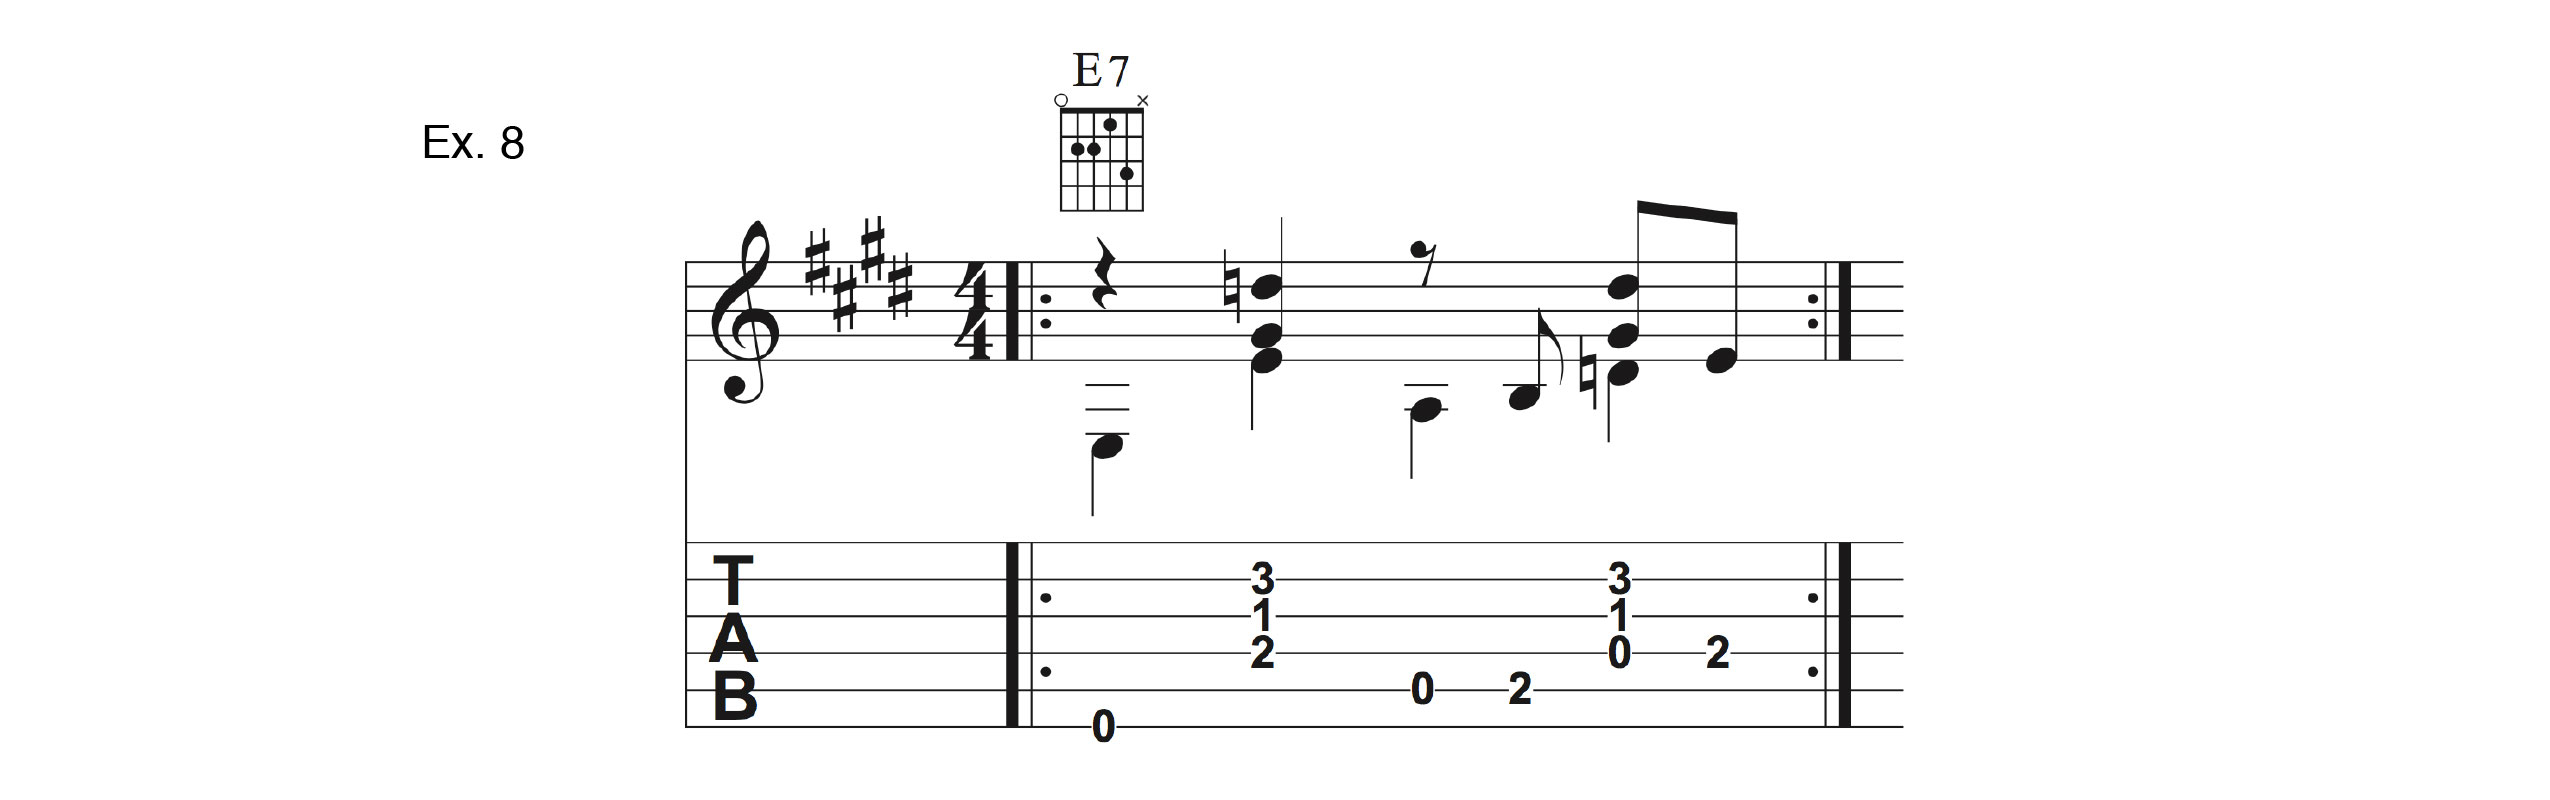
Once you’ve got the raw picking pattern down from Ex. 7 try applying it in Ex. 8 over a single chord E7 in first position. Notice the combination now of an open string being followed by a fretted note on beats 3 and beats 4, which will require you to modify your fingering during the measure.
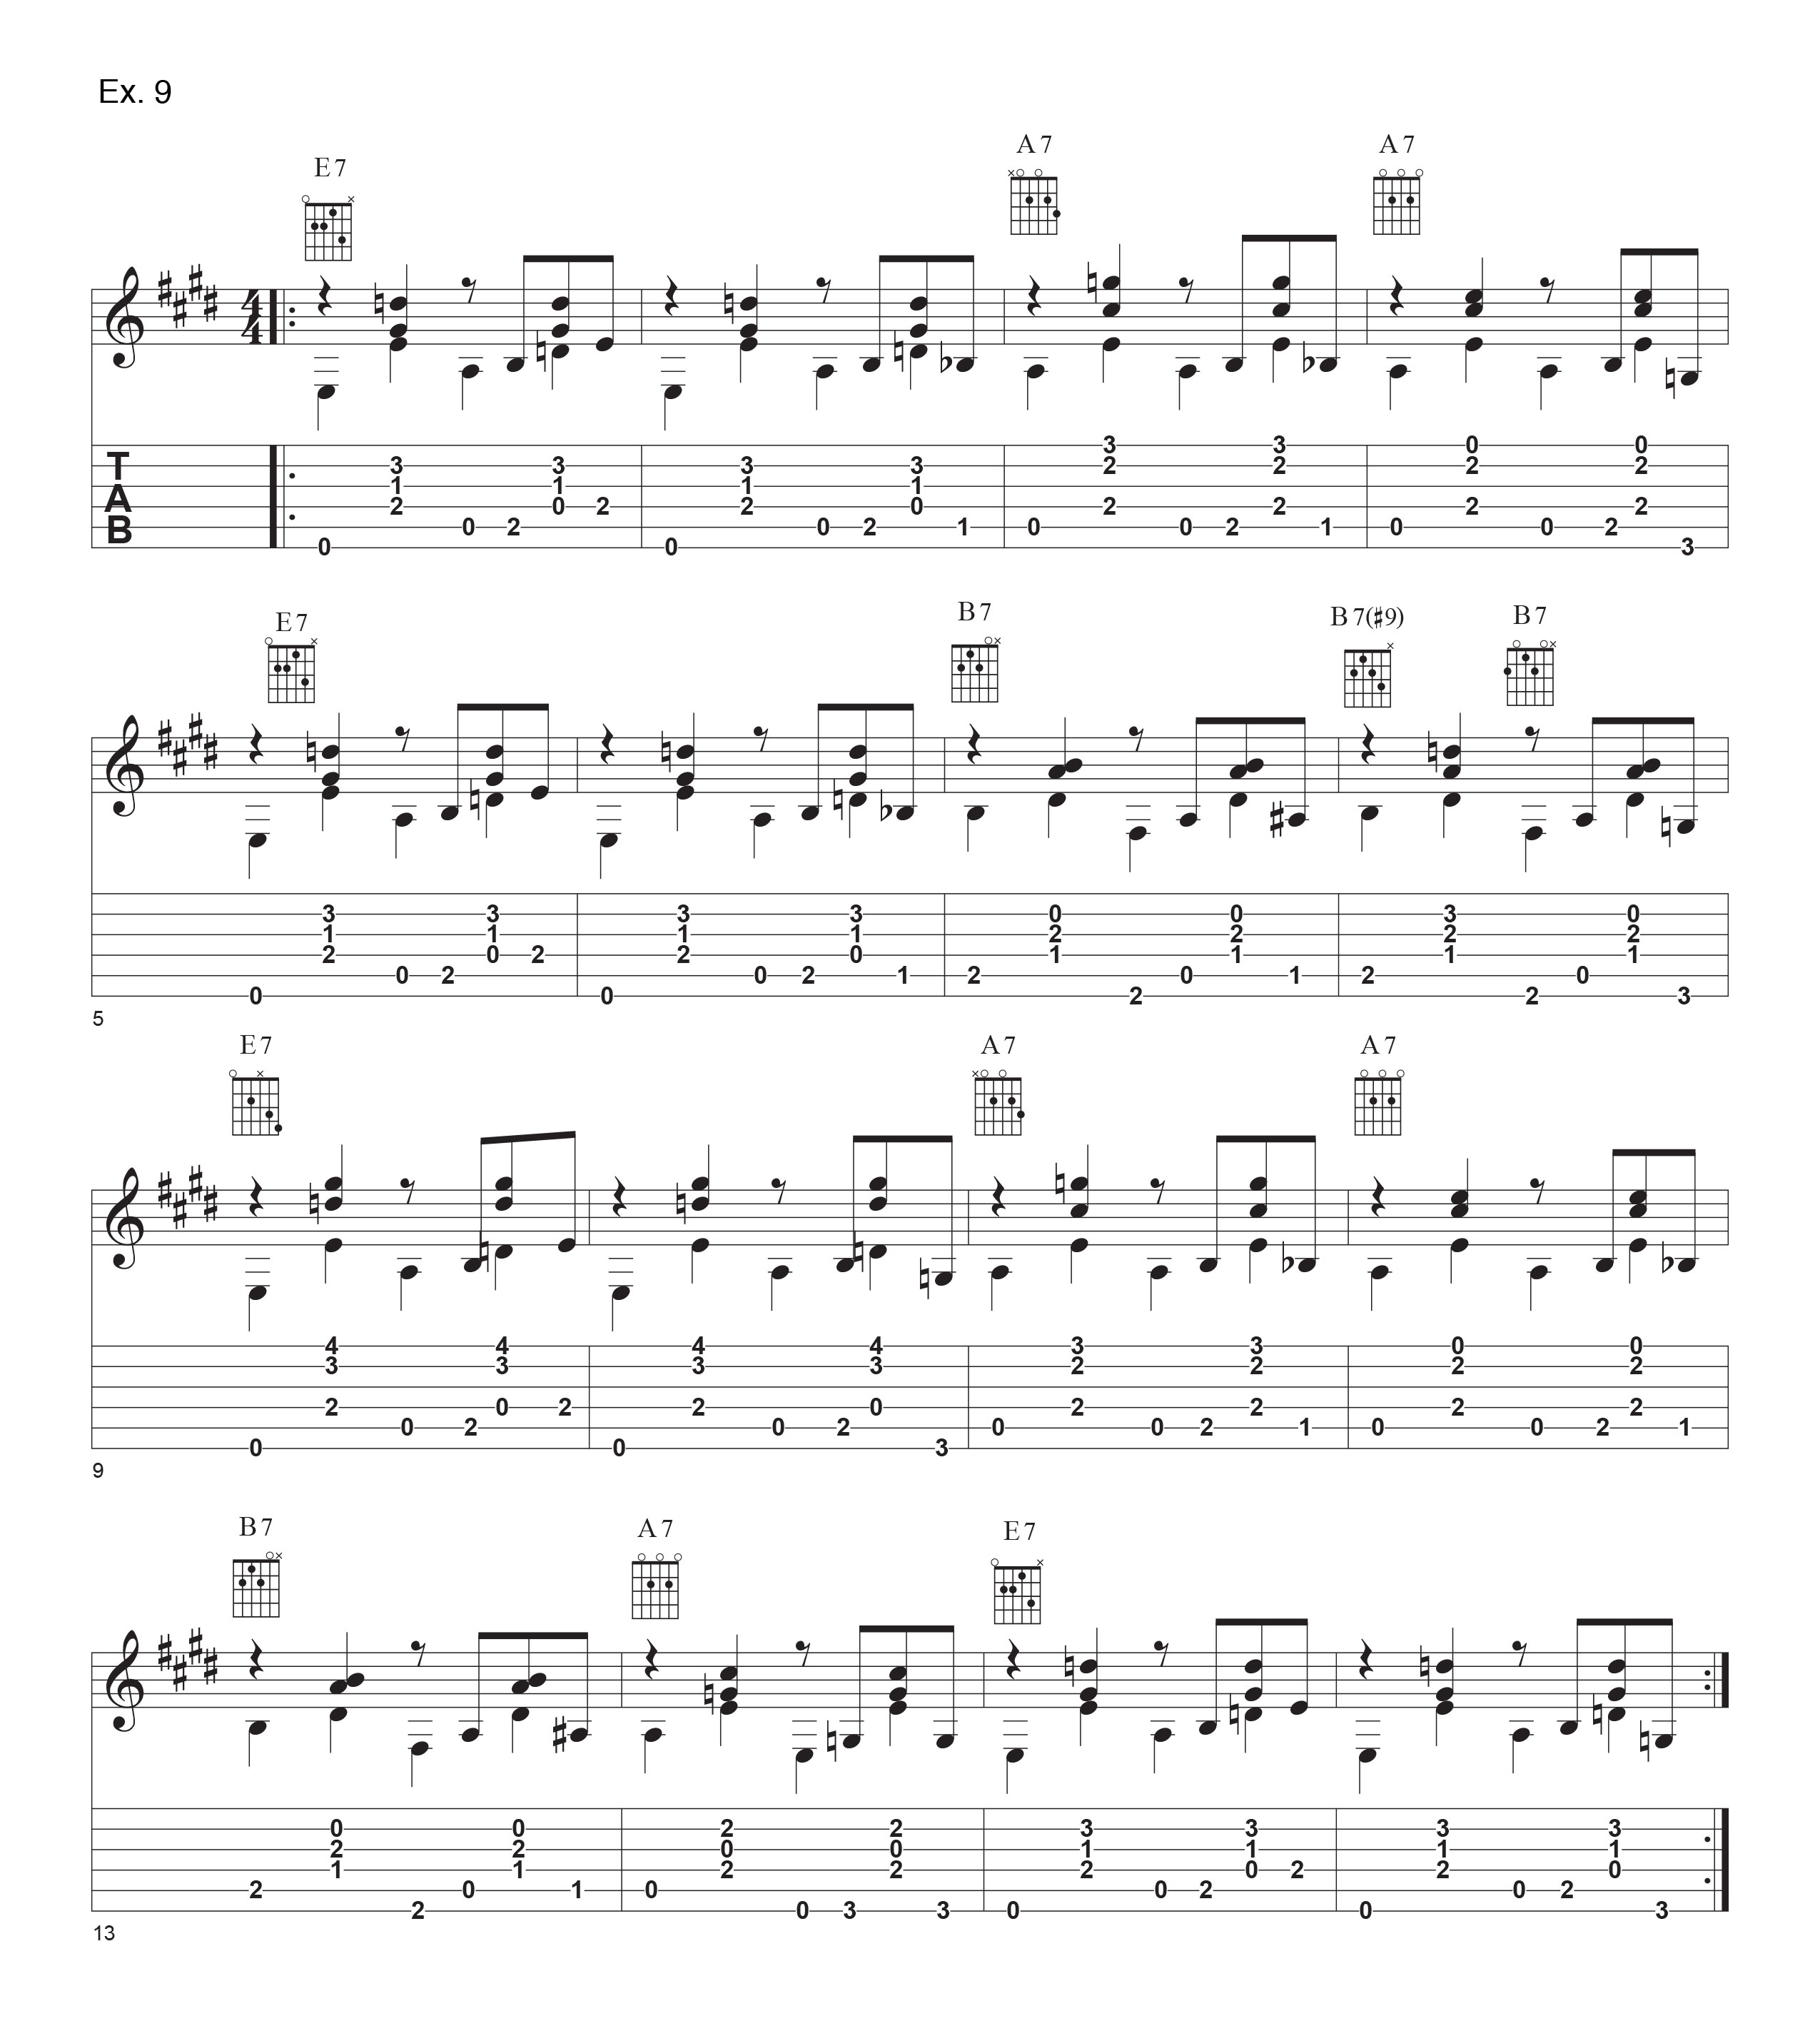
Ex. 9 takes the general pattern and concept from Ex. 8 and applies it to a 16-bar bluesy-etude in the key of E. You’ll want to pay special attention to keeping the picking pattern consistent (i.e. the same rhythm and same fingers playing on specific beats) with the fingerings shown in Ex. 7. It will be necessary however to vary which specific string a given finger will play, for example in measure 2 the index finger will pluck the 5th string on the “and” of beat four, and so on, in measure 3 the middle and ring finger have shifted to the 1st and 2rd string respectively, etc. Take your time, refer to Ex. 7, and these modifications should make more sense. You’ll also have to be intuitive and clever with your left hand fingerings throughout the etude to play it fluidly and efficiently.